

APIs also called as Application Programming Interfaces that act as the way of communication between Client and Server. REST APIs are the Representative State Transfer APIs that are created to perform the CRUD operations on the Data of the Database. Through this Article we will start from creation of Server to Building a Fully Functionable REST API .
Let’s Get Started💫
Step-1 : Initiating project using NPM and Installing Dependencies🔗
Firstly install Nodejs and Vs code(IDE) to create the Dev Environment locally . then to initiate a project open the local directory/folder and run the following command in the terminal:
npm init -y
Next We have to Install Dependencies i.e., Nodemon, Express, mongoose, dotenv, cors . To install these Dependencies run the following command in the terminal.
npm i express mongoose dotenv cors
npm i nodemon --save -dev
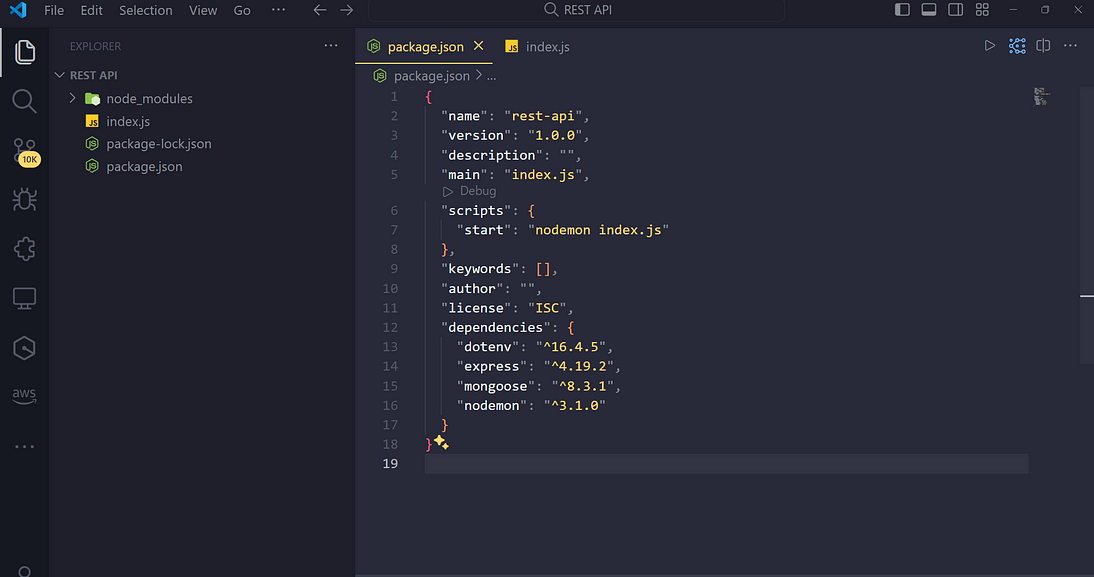
Now create a file server.js . then setup to the server.js as the root module to run on the nodemon . To do this open package.json and add the start command in scripts section as shown in the fig1:
Step-2: Creation ,Running of Server and Connecting to MongoDB
Firstly, Create a config.env file where we can include the variables the can’t be included in the code directly to be secure.(while pushing the code to Github we create a .gitignore where we ignore uncessary file like node_modules and secure files like config.env) .
In config.env include port number , MongoDB string and password of DB.
PORT=8000
MONGODB_STRING=mongodb+srv://username:<password>//enter your mongodb string
MONGODB_PASSWORD=<enter your password>
Be careful that not to include .env file while pushing the code which causes security threat
Now we have link the mongodb and also run the server on the mentioned port. To access the .env variables in the index.js file we have to import the dotenv module(already installed in step1) by the require function . Following the below code to write the index.js file.
const mongoose=require('mongoose');
const dotenv=require('dotenv');
dotenv.config({path : './config.env'}); //this configures the path of the.env variables
const app=express();

app.use(express.json()) //middleware

//replacing the <password> in the mongodb string to actual password
const DB=process.env.DATABASE.replace('<password>',process.env.DATABASE_PASSWORD);

//connects to the DB using mongoose
mongoose.connect(DB).then(()=>{
    console.log('Database is connected');
});

// Making the express server running on a particular port
const port=process.env.PORT||9000;

app.listen(port,()=>{
    console.log(`Server is running on port ${port}`);
})
Now To run the server open the terminal and run the following command
npm start
Congrats 🎉you have successfully completed the step of running the server and connecting to MongoDB cluster
Step-3 : Creation of MongoDB models by writing the schemas✅
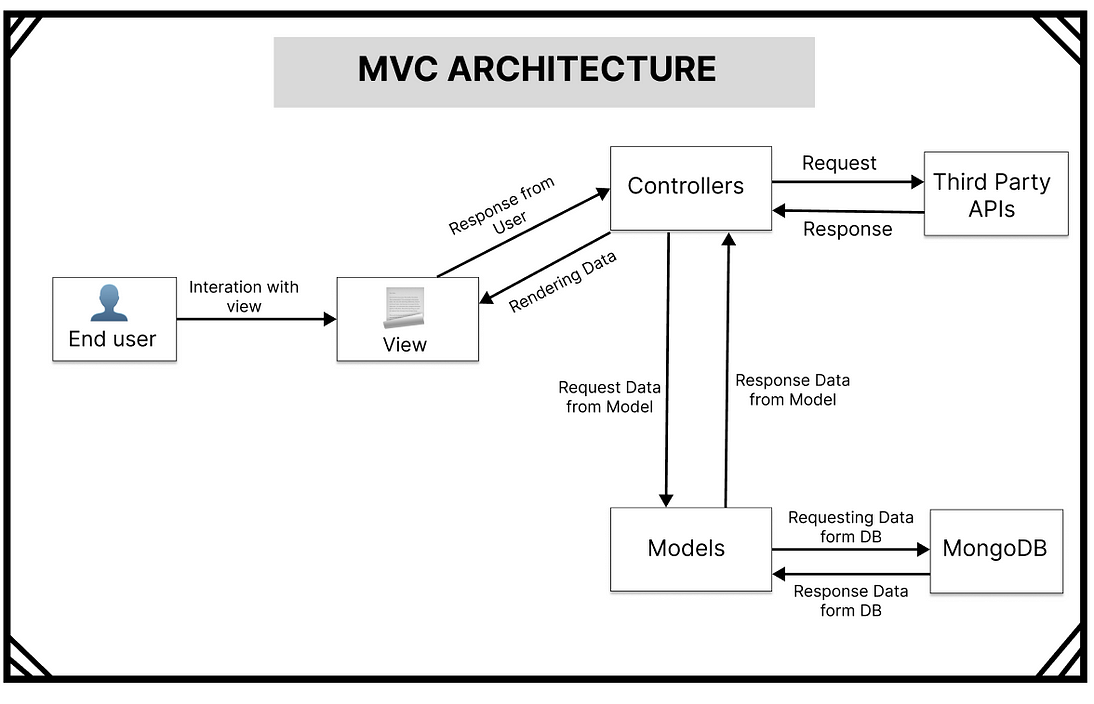
In this section , we will head to the main step 1 of creation of REST API .Here we use the MVC Architecture where we make separate folders for Models, View ,Controllers. In Models we write the DB schemas and create the models.
Now we will create a sample model of books. To write the models create a sub folder named Models . Then add a file named Book-model.js. we will now design a schema and Make a mongoose Model.
const mongoose = require("mongoose");
const { Schema } = mongoose;

//using the mongoose lib create a Schema
const bookSchema = new Schema(
  {
//parameters of describing the book details
//type describes the given paramter type
// required field describes the parameter is compuslory or not
    title: { type: String, required: true },
    authors: [{ type: String, required: true }],
    isbn: { type: String, required: true, unique: true },
    genre: { type: String, required: true },
    publisher: { type: String, required: true },
    publicationDate: { type: Date, required: true },
    edition: String,
    language: { type: String, required: true },
    pageCount: Number,
    format: String,
    dimensions: String,
    weight: Number,
    description: String,
    coverImage: String,
    rating: Number,
    reviews: [{ body: String, date: Date, reviewer: String }],
    awards: [String],
    additionalNotes: String,
  },
  { timestamps: true }
);

//exporting a mongoose model by aquiring the schema
module.exports = mongoose.model("Book", bookSchema);
Now restart the Server and you will observe that a new section will be created named books in the cluster of the MongoDB compass.
Yep, That’s it you have successfully created a mongoose model .
Step — 4 : Creation of Controllers
Now we are in the 2nd main step of creating the REST API, here we will create a new folder Controllers in the root directory. In that Controllers folder we will create a new file Book-controller.js.
In this controller we will export 5 modules which are handled by 4 Requests(GET, POST,PATCH ,DELETE). Now we have to Create that 5 Modules that performs the Requests
Get All Data: To return all the data of a particular model we have to use the <Model>.find() function . As we are not mentioning any condition here we will await a response of all the data. to handle this function the GET Request (status code: 200) is used.
Create a new Data Object: In this function we will receive the data object from the Frontend . That can be accessed here using req.body Now we await a response i.e., <Model>.create(req.body) . Using this function as the data should be received from the frontend we use the POST Request(status code : 201) to fulfill the request.
Get Data By ID: To return the object of particular ID of a particular model we have to use the <Model>.findById(req.params.id) function . As we are mentioning the condition so that here it await a response of the data of a particular ID. to handle this function the GET Request (status code: 200) is used.
Update Data: In this function we will receive the request to update data object for a particular Id from the Frontend . The updated data object can be accessed here using req.body Now we await a response i.e.<Model>.findByIdAndUpdate(req.params.id, req.body, { new: true,}) ..,Using this function as the updated data of particular id should be received and updated ,we use the PATCH Request(status code : 200) to fulfill the request.
Delete Data of particular Id: If you want to delete a data object of a particular id we await a response By the using the <Model>.findByIdAndDelete ( req.params.id). This function will be handled on DELETE Request (Status code :204).
const express = require("express");
//import the Book Model from Book-Model.js created in step-3
const Book = require("../Models/bookmodel");

//GET ALL DATA
const getallbooks = async (req, res) => {
  try {
    const allbooks = await Book.find();
    res.status(200).json({
      allbooks,
    });
  } catch (err) {
    res.status(500).json({
      status: "fail",
      msg: err.message,
    });
  }
};

//CREATION OF NEW DATA/INSERTION OF NEW OBJECT
const createbook = async (req, res) => {
  try {
    const newbook = await Book.create(req.body);
    res.status(201).json({
      newbook,
    });
  } catch (err) {
    res.status(500).json({
      status: "fail",
      msg: err.message,
    });
  }
};

//GET OBJECT BY ID
const getById = async (req, res) => {
  try {
    const BookById = await Book.findById(req.params.id);
    res.status(200).json({
      BookById,
    });
  } catch (err) {
    res.status(500).json({
      status: "fail",
      msg: err.message,
    });
  }
};

//UPDATING THE DATA OF PARTICULAR OBJECT
const updatebook = async (req, res) => {
  try {
    const bookup = await Book.findByIdAndUpdate(req.params.id, req.body, {
      new: true,
    });
    res.status(200).json({
      bookup,
    });
  } catch (err) {
    res.status(500).json({
      status: "fail",
      msg: err.message,
    });
  }
};


//DELETION OF PARTICULAR OBJECT PERMANENTLY
const deletebook = async (req, res) => {
  try {
    const deletebook = await Book.findByIdAndDelete(req.params.id);
    res.status(204).json({
      deletebook,
    });
  } catch (err) {
    res.status(500).json({
      status: "fail",
      msg: err.message,
    });
  }
};

module.exports ={
getallbooks, createbook, getById, updatebook, deletebook  };

Step-5 :Creation of Routes and Handling Requests
The Requests on a particular route is handled by routers. Now we have create a new folder named Routes in the root directory . In that create a file named Book-Router.js . In this we have import the all the functions that need to make requests(which are present in the controllers) . For this we will create a new router by express.Router() function and by mentioning the routes and type of request for the imported functions the express router will serve it’s purpose and is exported to index.js.
const express=require('express');
const { getallbooks, createbook, getById, updatebook, deletebook}=require('../Controllers/book-Controller');
const BookRouter=express.Router();

BookRouter
.route('/')
.get(getallbooks)   // Get Request for Getallbooks module
.post(createbook)    //post request for creating a new Book

BookRouter
.route('/:id')    //By mentioning the :id we will able to access the params named id
.get(getById)      //Get Request to return the data according to id
.patch(updatebook)  //update a object of particular id
.delete(deletebook)  //Delete the Object

module.exports=BookRouter;
Step-6 : Linking Routes Through using Middleware& Writing CORS
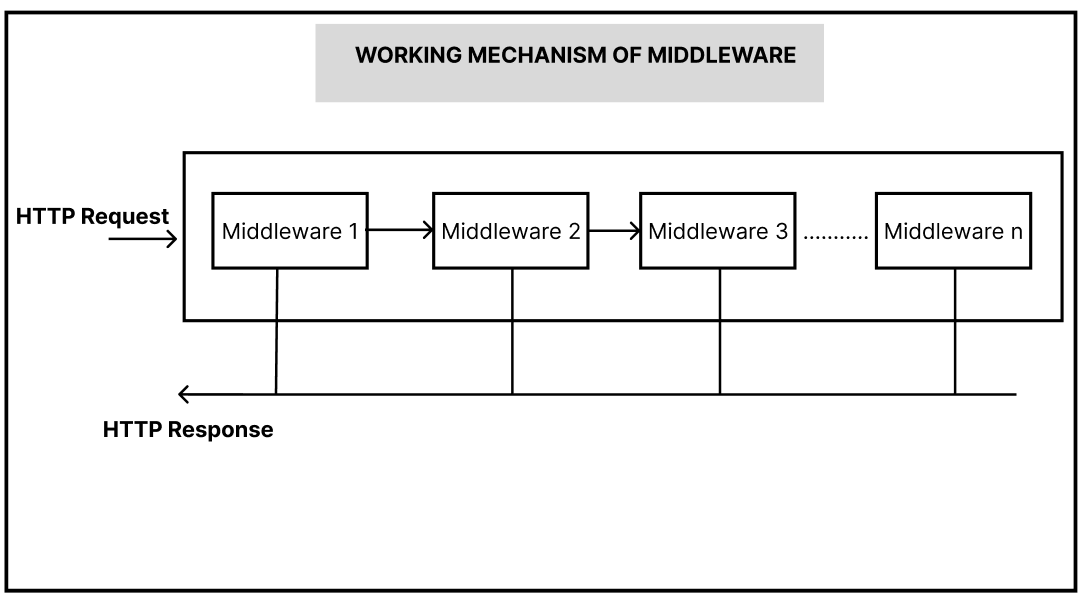
Middleware : In the request response cycle between the request and response there will be chain of middlewares which helps us to deal with requesting and responding an object. these are created by function named express().use().
Now we will import the Book Router to index.js file. and then we will create three middlewares that are required here.
express.json(). this is the main and last point of the set of middlewares. This parses the incoming JSON data from the http header and sends response accordingly.
we will link the imported book router to server through the app.use() function where we give 2 parameters one is the route link and the router name.
To establish connection with frontend we will use a middleware named CORS which is known as Cross Origin Resource Sharing. in which this middleware contains a parameter named origin where we mention the URL of frontend and a parameter named methods where we mention the type of requests.
const express = require("express");
const mongoose = require("mongoose");
const dotenv = require("dotenv");

//importing cors module
const cors=require('cors');

//importing the Book Router
const BookRouter = require("./Routes/Book-Router.js");
const app = express();

dotenv.config({ path: "./config.env" });

app.use(express.json());

//linking The Book-Router
app.use("/api/books", BookRouter);


//Cors implementation for linking with Frontend
app.use(
  cors({
    origin: "<Enter Your Frontend URL>",
    methods: ["GET", "POST"],
    credentials: true,
  })
);

const DB = process.env.DATABASE.replace(
  "<password>",
  process.env.DATABASE_PASSWORD
);

mongoose.connect(DB).then(() => {
  console.log("Database is connected");
});

port = process.env.port;
app.listen(port, () => {
  console.log(`Server is running on port ${port}`);
});
Step-7: Final Checkout& Conclusion
Hurray 🎉🎉🎉, Finally you have completed the creation of fully functionable RESTful API from initiating the project to Linking the API to frontend.
It’s Something you have to be proud of, Yes Right✅!……….In the next Article we will see the adding of Advanced features to API and Securing of REST API.
Follow me for more Articles…..
Peace Out✌️